Create new Instances of a C# Class and store them in a List (h4-08)
We want to use several objects in our C# program. For example, we want to draw many rhombuses on the screen. For this we need the C# new keyword. If we keep these objects in a C# list, we can do other things with them later. For example, give each rhombus in our list a different color.
Create multiple instances of a class
In the previous post we made a draft for the game board of our HexaFour game. We will now draw the first elements of the game board.
There are several objects of one type on the board. For example, we need to draw lots of rhombuses. But so far our code has only ever worked with one object. What do we have to do in C# to create multiple objects?
Let’s go back to the Turtles for a moment. Our first program created exactly one Turtle:
public static void WoopecMain()
{
    var seymour = Turtle.Seymour();
    seymour.Left(45);
    seymour.Forward(100);
}
We had used the auxiliary method Turtle.Seymour() to create a turtle. This method made it easier for us to get started with programming. However, if we want to create several turtles, this method will not help. We have to go the normal C# way to create objects. In C#, new objects are created with the new keyword:
public static void WoopecMain()
{
    var turtle1 = new Turtle();
    turtle1.Shape = Shapes.Turtle;
    turtle1.Color = Colors.Blue;
    turtle1.Speed = Speeds.Slowest;
    turtle1.Left(45);
    turtle1.Forward(100);

    var turtle2 = new Turtle();
    turtle2.Shape = Shapes.Turtle;
    turtle2.Color = Colors.Green;
    turtle2.Speed = Speeds.Slowest;
    turtle2.Right(45);
    turtle2.Forward(100);
}
Each new Turtle() command creates a new Turtle. In C# this is called an instance. So here we create two instances of the Turtle class, first turtle1 and then turtle2. When we run the program, we first see blue turtle1 moving to the top right and then green turtle2 moving to the bottom right of the screen.
It is best to try out the above code step by step in the Visual Studio debugger - how to do this is described in the fourth post if this series. You can then see that variables turtle1 and turtle2 have different values. For example, at the end of the program, the Position property of variable turtle1 has a different value than that of variable turtle 2.
A little tip: You often create an object using new and then set individual properties of the object directly afterwards - as in the above example Shape, Color and Speed. This can be done more compactly using a so-called object initializer. The code then looks like this:
var turtle1 = new Turtle { Shape = Shapes.Turtle, Color = Colors.Blue, Speed = Speeds.Slowest };
And a second tip: The program can also be rewritten so that the two Turtles move at the same time. Details can be found in the documentation of Woopec.
Display a rhombus on the screen (with Woopec Shapes)
The game board consists of many rhombuses. We will now construct such a rhombus using the third picture from our concept:
public static void WoopecMain()
{
    var radiusOfToken = 20.0;           // size of the token
    var edgeLength = 2 * radiusOfToken; // length of an edge of the rhombus

    // Draw the edges of a rhombus in the center of the screen.
    var pen = new Pen();
    pen.Move(edgeLength / 2);
    // pen.IsDown = true; // If you want to see what is drawn, remove the comment here
    pen.BeginPoly();
    pen.Rotate(120);
    pen.Move(edgeLength);
    pen.Rotate(120);
    pen.Move(edgeLength);
    pen.Rotate(60);
    pen.Move(edgeLength);
    pen.Rotate(120);
    pen.Move(edgeLength);
    var polygon = pen.EndPoly();
    var shapeName = "rhombus";
    Shapes.Add(shapeName, polygon);

    // Create game board
    var turtle = new Turtle { Shape = Shapes.Get(shapeName) };
}
This code does the following:
- The edge of a rhombus should be as long as the diameter (or twice the radius) of a token. The upper half of the rhombus is an equilateral triangle. The angles in the rhombus are therefore 120 degrees.
- First, we use a Woopec Pen class to create this rhombus. We have already done something similar in the sixth post of this series. Here, however, the methods
BeginPolyandEndPolyare used instead of the methods BeginFill and EndFill. The EndPoly method returns the polygon that was drawn by the Rotate and Move commands after BeginPoly. - We can add this polygon as a shape under a name in the central Woopec class
Shapes. We save it here with theShapes.Addmethod under the name “rhombus”. - The shape can then be read with the
Shapes.Getmethod and used as a shape for a Woopec object. The code above creates an instance of the Turtle class, which then has the shape of the rhombus and is displayed on the screen.
Using the Woopec Figure class
So far we have used the Woopec Turtle class. This class is a good way to get started with programming. However, we are now a little more familiar with programming and no longer need it. From now on we will use the Figure class. This class is used for figures that should move on the screen without drawing a line behind them.
We can change the last lines from the above program like this:
    // Create game board
    var boardElement = new Figure { Shape = Shapes.Get(shapeName), IsVisible = true };
There are two points to note:
- A
Figureis initially invisible; the figure is only visible when the IsVisible property is set to true. - As with
Pen, there are no Left and Right methods here, instead there is theRotatemethod. Similarly, Forward and Backward are replaced byMove.
Save instances in a list
As a small intermediate step, let’s draw a few rhombuses next to each other:
    // Create game board
    var rhombusWidth = 2 * radiusOfToken;
    for (var column = 1; column <= 9; column += 2)
    {
        var boardElement = new Figure() { Shape = Shapes.Get(shapeName), IsVisible = true, Heading = 90 };
        boardElement.Position = (column * rhombusWidth, 0);
    }
For the sake of simplicity, we have created five Figure instances here and moved them to suitable positions. By setting the Heading property to 90 degrees, the rhombuses are rotated correctly.
Now imagine that we want to change these five Figure instances later. To do this, we need to store them somewhere. The easiest way to do this is to use a C# list. A list of Figures can is created in this way:
var boardElements = new List<Figure>();
Again, new was used to create an instance. This time the instance is a list with the name boardElements. The expression List<Figure>() specifies that a list is to be generated in which Figure instances can be stored.
If the Visual Studio compiler cannot do anything with the List type and displays an error message, you must specify this at the top of your program:
using System.Collections.Generic;
We can now store every figure created in this list:
    var boardElements = new List<Figure>();
    for (var column = 1; column <= 9; column += 2)
    {
        var boardElement = new Figure() { Shape = Shapes.Get(shapeName), IsVisible = true, Heading = 90 };
        boardElements.Add(boardElement);
        boardElement.Position = (column * rhombusWidth, 0);
    }
The boardElements list then contains five entries. With a for loop, for example, we can give each figure a different color:
    for (var index = 0; index < boardElements.Count; index++)
    {
        Figure boardElement = boardElements[index];
        boardElement.Color = Colors.Red;
    }
With boardElements.Count we get the numbers of elements in the list. With the expression boardElements[index] we get the element at position index in the list. Please note: The index count starts with 0 and not with 1.
If you want to do something for all elements of a list, it is even easier with a foreach loop:
    foreach (Figure boardElement in boardElements)
    {
        boardElement.Color = Colors.Red;
    }
You can find more information about using lists on Microsoft Learn.
You can also manipulate such lists with LINQ and program almost completely without loops. But I’ll explain that in more detail later.
Draw the game board
Now we have everything together to write the code that draws the rhombuses as we designed it in the last picture in the previous post:
// Create first game board
var rhombusWidth = 2 * radiusOfToken;
var rhombusHeight = Math.Sqrt(3) * 2 * radiusOfToken;
var maxRow = 4;
var maxColumn = 10;
var boardLowerLeftX = -300;
var boardLowerLeftY = -100;
var color = Colors.LightGray;
var boardElements = new List<Figure>();
for (var row = 0; row <= maxRow; row++)
{
var firstColumn = 0;
var lastColumn = maxColumn;
if (row % 2 == 1)
{
firstColumn = 1;
lastColumn = maxColumn - 1;
}
for (var column = firstColumn; column <= lastColumn; column += 2)
{
var boardElement = new Figure() { Shape = Shapes.Get(shapeName), Speed = Speeds.Normal, Color = color, Heading = 90 };
boardElements.Add(boardElement);
boardElement.Position = (boardLowerLeftX, boardLowerLeftY);
boardElement.IsVisible = true;
boardElement.Position = (
boardLowerLeftX + column * rhombusWidth,
boardLowerLeftY + row * rhombusHeight
);
}
}
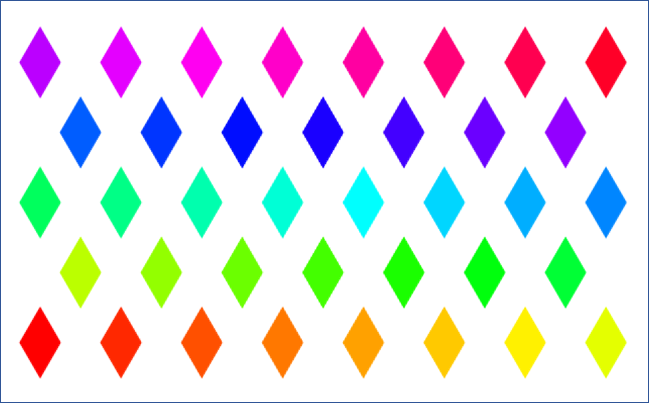
// Give each rhombus a different color
var hue = 0.0;
var hueSkip = 360.0 / boardElements.Count;
foreach (var be in boardElements)
{
be.Color = Color.FromHSV(hue, 1, 1);
hue = hue + hueSkip;
}
The basic ideas of this code have already been explained. Only the details are added here:
- First, a few variables are defined for the width and height of a rhombus (see previous post), number of rows and columns, coordinates of the game board and color of the rhombuses.
- The rows of the game board are created in an outer for loop.
- For each current row, rhombuses are placed column by column on the board in an inner for loop.
- In every second row, the rhombuses must be offset by one column. This is done by checking for
(row % 2 == 1). The%character is the so-called Modulo operator. This calculates the remainder when dividing by the specified number (here 2). Ifrowis even, the value is 0, otherwise the value is 1. - For each rhombus, we create a boardElement with
newand place it in the correct position. - At the very end, we give each rhombus a different color. For the coloring we use HSV colors and the Woopec method
Color.FromHSV. The hue parameter defines the base color, which lies on a color circle with values between 0 and 360 degrees. We calculate a hueSkip such that the rhombus colors use the entire color circle.
You can see the result of this code in the picture at the very beginning of this post.
This have taken a big step towards the final game board now. But our program is getting longer and longer and is starting to become confusing. We have to change that. We need to divide the program into smaller methods. We’ll do that next time.
The bottom line
To create new instances of a C# class, we have used the new keyword. We used a C# list to save multiple instances. With the Figure class from the Woopec library, we were able to draw the first version of our HexaFour game board.
If you want to try something yourself: The board design from the previous post also contains “half” rhombuses on the edges of the board. Can you extend the code accordingly?
TL;DR
This post is part of a series. You can find the previous post here, the next post here and an overview here.
C#
- Create instances of a type with the
newkeyword. Object initializers can be used for simpler initialization. - A list of type T can be created with
new List<T>(). The Count property specifies the number of elements. With[index]you get the element at this index, attention the count starts at 0. The foreach loop runs through all elements of a list. More information about using lists on Microsoft Learn. - The Modulo operator calculates the remainder when dividing by the specified number.
Woopec library
- Use methods BeginPoly and EndPoly to obtain the points of a drawn shape.
- Save shapes under a name with method Shapes.Add and read with method Shapes.Get.
- The Colors.FromHSV method can be used to create rainbow colors.
- Advanced users can use the Figure class instead of the Turtle class. In this article the methods Rotate and Move, as well as the property IsVisible were used. For more information, see the Woopec documentation.
Comment on this post ❤️
I am very interested in what readers think of this post and what ideas or questions they have. The easiest way to do this is to respond to my anonymous survey.