First think about a Concept, then take the next Coding Step (h4-07)
Software development has a lot to do with finding good solutions. Sometimes this is easy, but often it is complicated. In these cases it makes absolutely no sense to start programming immediately. If you do that, it will take you much too long to find a good solution. It is much better to design a good concept first and then start programming.
In my previous post I wrote that conceptual work is important in professional software development. But the same is true for the HexaFour game, which we want to program step by step here. In the fifth article of the HexaFour series we already wrote code that draws a hexagon. For this we didn’t need a concept. But next we need code that draws the game board. This is not as easy as it looks at first. Here it is definitely worth making a concept first.
Concept for the game board
One of the first sketches of my game idea from the first post of this series looked like this:

That was perfectly sufficient as a first sketch. But as a basis for a program it was still too imprecise, many important details were not clarified: The hexagons must move through the board, there must be no places that are too narrow. What width and height must the rhombus-shaped structures have then? What are the horizontal and vertical distances between the rhombuses? Which objects on the board are necessary, which are superfluous and can be omitted in the first step? It would not have been a good idea to start programming right away and to clarify these questions during the process. It was much better to make a more detailed design first.
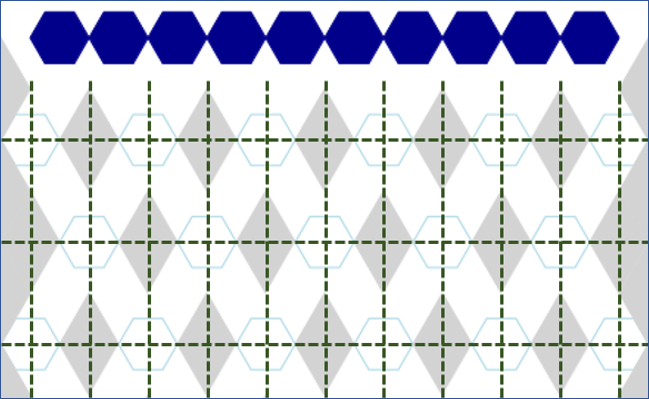
To do this, I had to think for some time and try a few things with paper and pen (and with shapes in PowerPoint). In the end I had a good feeling that it should work like this:
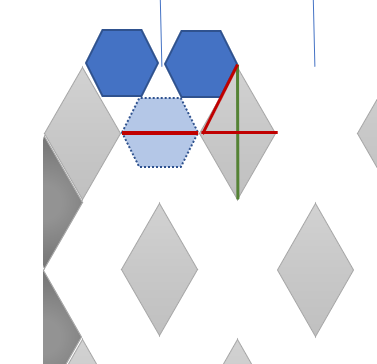
This picture answers all questions: All sizes are derived from the width (marked in red) of a token. A rhombus (marked in light gray) is as wide as the token. The sides of the rhombus are as long as the width of the token. The height (marked green) of the rhombus can then be easily calculated with a little math. The horizontal distances of the rhombuses correspond to the width of a token. The positions of the rhombuses of the next row are one rhombus height lower in relation to the current row and are offset by one rhombus width. We can border the edge of the board with half rhombuses (marked in dark gray).
This design was not 100 percent perfect. But it didn’t have to be, because it was perfectly adequate as a concept for programming. I had all the information needed to draw the game board.
Concept for the coordinate system
You can view the objects on the board from two perspectives. For drawing the objects the exact screen coordinates, widths and sizes of the objects must be known. But for playing with the objects this is not relevant. There one would rather speak of rows, columns and slots. And one would mark these with letters or numbers. So there are two different coordinate systems. Which of these two coordinate systems do we use as a basis? I decided to use the player coordinate system. I use numbers to indicate a specific row, column or slot. And I start the count within the program with 0. The following picture illustrates this:
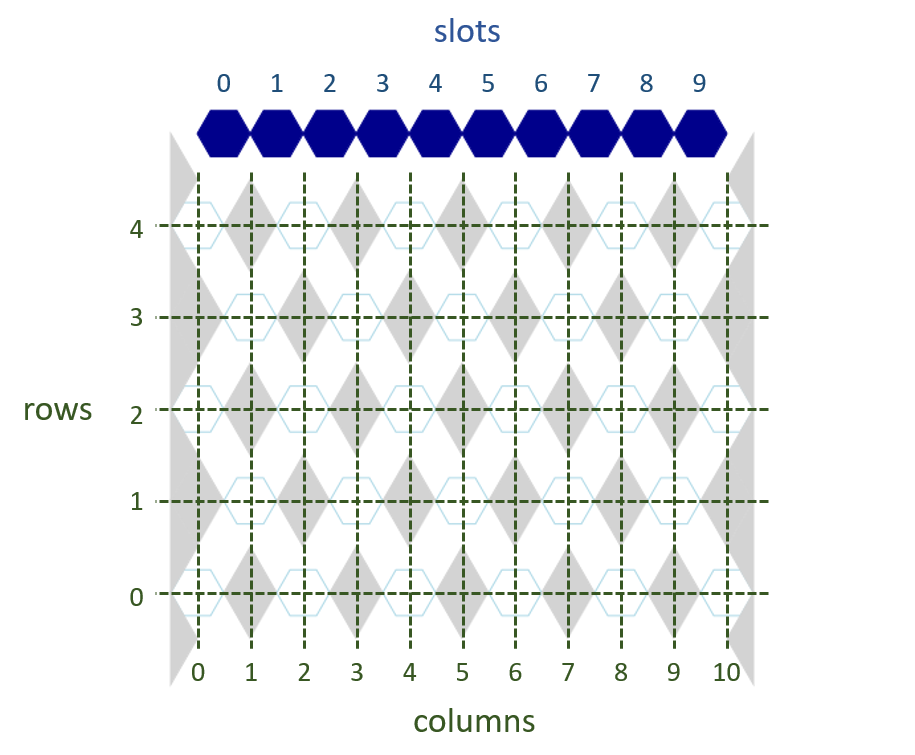
I also needed a bit of time for this concept. There are many decisions in this concept that I could have made differently. For example, I could have made the columns twice as dense. This might have had the advantage of using the same coordinates for slots and columns. I could also have started the numbering of rows and columns with 1 instead of 0. But in the end I had the feeling that exactly this concept is a good basis for my program code.
Define names for the important things
While working on the concepts, names for the objects of the game have also emerged: There are game tokens and a game board. The game board consists of rhombuses and half-rhombuses. These are arranged in columns and rows. Game tokens can be placed in slots.
If we always use these names in the program code, the code and concept will fit well together and explain each other.
If you want to delve deeper into this aspect, I recommend you take a look at the article on Domain-driven design on Wikipedia.
The bottom line
You don’t need a big concept for everything from zero to the finished program, that would be much too difficult. But it often makes sense to create a concept for the next steps. In professional software development this is also done, for example in the “Dual Track Agile” approach, this means roughly: There is a development track, in which the program code is written. And in parallel, there is a second track, in which the concept for the next coding steps is developed.
A concept doesn’t have to be a big document with lots of text, it’s enough to have a clear idea of how we want to proceed. But it’s worth investing enough time in the concept, thinking a little longer about alternative solution approaches and discussing them with other people. With a bad concept, you end up losing time because you have to discard things and start over more often.
Therefore, at the end, I have a few questions about the concepts presented here. There is always more than one possibility. Does the board have to be rectangular? Do the tokens have to be “thrown in” from above? Do the tokens have to be hexagonal? Can the rhombuses be made smaller or larger? Do they have to be rhombuses or are other shapes useful? What would your concept look like?
Unfortunately, I don’t know your ideas, so I’ll continue with my concept in the next post.
Comment on this post ❤️
I am very interested in what readers think of this post and what ideas or questions they have. The easiest way to do this is to respond to my anonymous survey.