Automated testing with Visual Studio, do it right from the start (h4-14)

What is the point of automated tests? Obviously, code can be tested faster and easier if tests can be executed automatically. But you also save development time and the code has a better structure.
MSTest, NUnit or xUnit as a framework? Test-driven development or just test first development? Unit tests or integration tests? 100% code coverage or 90%? These are all secondary questions. The important thing is to start with automated tests as soon as possible. It’s worth the effort.
Why automated testing?
Do you know this situation: You have changed something in your program and want to test whether it works. You start the program, which takes a few seconds. Then you make a few entries so that the program runs through your changes. This also takes some time. Then you realize that something is not working properly. You change something in the code. And the whole process starts all over again. Is that fun? No. Does it take a lot of time? Yes. Can it be improved? Yes, by working with automated tests right from the start.
Code example
As an example, I’ll use the code from my previous post. In that post, I described all the technical steps you need to take to set up tests for the first time. The code is available on GitHub and can be easily downloaded.
Choosing a test framework
Visual Studio offers three test frameworks for the code to be tested here:
- MSTest - Microsoft test framework for all .NET languages.
- NUnit - a unit-testing framework for all .NET languages, initially ported from JUnit (for Java).
- xUnit - a free, open source, community-focused unit testing tool for the .NET Framework.
Which is the best? My impression is that they only differ in details, so you can use either one for normal projects. I use xUnit here.
Setup for automated tests
The initial setup is somewhat extensive, which is why I described this separately in the previous post.
After executing the steps described there, the solution contains an xUnit test project named HexaFour.Tests. And this test project contains a test class GameStateTest with an initial test method:
[Fact]
public void Test1()
{
    var gameState = new GameState(6, 10);
}
As described in the previous post, we can use the test explorer to display and execute all tests.
Before I describe the implementation of real tests, I will briefly discuss the structure of the code and a conflict between information hiding and automated tests that needs to be resolved at the beginning.
Code structure and information hiding
The solution of the HexaFourV03 example has the following structure:
- There is a project called “HexaFour”. All classes in the project belong to the namespace “HexaFour”.
- In this project there is a class called GameState. This class is declared as internal. We want to write automated Tests for this class.
- The GameState class has properties and methods, some of which are declared as public, others as private.
- There is a second project called “HexaFour.Tests”, which should contain all tests.
- The test project contains the “GameStateTest” class, which should contain all tests of the “GameState” class.
The above aspects give structure to the code.
On the one hand, the code is structured hierarchically: (1) solution (2) projects and namespaces (3) classes (4) methods and properties.
On the other hand, the visibility is determined by labeling as public, internal or private:
- An internal class can only be used within the project in which it is declared.
- A private method or property can only be used within the class in which it is declared.
- Only if a method and its class are public the method can also be used in another project.
It is good practice to keep the visibility of objects as low as possible. If a method is private and not public, it cannot be used by other classes. I can easily change it without having to adapt other classes. If a class is internal and not public, it cannot be used by other projects. I can change it without having to change other projects. If we restrict visibility in this way, we are following the Information Hiding Principle (see Information hiding - Wikipedia).
Information hiding and problems with testing
The information hiding principle leads to a small hurdle in the test: The GameState class is declared as internal because of this principle. However, I want to use GameState methods in the GameStateTest class. But I can’t do that because the GameStateTest class is located in a different project and the test class can’t “see” the methods of GameState. This problem can be solved by a trick, described in the previous post in section “testing internals”.
But there is no trick for private methods, private methods of the GameState class cannot be used in tests. We can only test them indirectly by calling a public method of GameState that uses this private method internally. However, this is usually sufficient. And it has the advantage that we can change all private methods in GameState as we like without having to adapt the tests.
An example with a method to be tested
In the second part of the post Defining classes in C# we implemented the GameState class. This depicts a game board on which two players can place game tokens. A player has won when their tokens form an uninterrupted diagonal row of four tokens anywhere on the board. The PlayerHasConsecutiveTokens method is intended to check this. We want to write automated tests for this method.
The code for this method will be a little more complicated: There are two types of diagonal rows (from bottom left to top right, or from top left to bottom right). If the check hits one of the board boundaries, it must stop. Etc.
We first implement only the body of the method, without any further content, so that we can call the method from a test:
internal class GameState
{
    // Other GameState methods (omitted here) ...

    /// <summary>
    /// Check whether there is a diagonal row of <paramref name="count"/> tokens from
    /// player number <paramref name="playerNumber"/> on the board.
    /// </summary>
    public bool PlayerHasConsecutiveTokens(int playerNumber, int count)
    {
        return false;
    }
}
Now we consider which scenarios the method must take into account. And we implement a test for the first scenario.
Implementation of the test
The first test is to check whether the method PlayerHasConsecutiveTokens returns true for a game board on which four tokens of a player are in a row. To do this, we add this method to the GameStateTest class:
[Fact]
public void PlayerHasConsecutiveTokens_WithFourTokensInARow_ReturnsTrue()
{
    // arrange
    var sut = new GameState(4, 10);

    const int playerNumber = 1;

    sut.SetToken(playerNumber, 3, 7);
    sut.SetToken(playerNumber, 2, 8);
    sut.SetToken(playerNumber, 1, 9);
    sut.SetToken(playerNumber, 0, 10);

    // act
    bool result = sut.PlayerHasConsecutiveTokens(playerNumber, 4);

    // assert
    Assert.True(result);
}
The name of the test method is very long, but there is a reason for that: Here we follow the pattern described in Best practices for writing unit tests - Microsoft Learn. The name should consist of three parts separated by _: Name of the method to be tested, tested scenario, expected result.
There is also a pattern for the test code, which always consists of three parts:
- The Arrange part generates the input required for the test. In the example, the class is created (the abbreviation “sut” stands for system under test) and four tokens are placed on the game board.
- The method to be tested is called in the Act part.
- The result is checked in the Assert part. To do this, we use the
Assert.Truemethod provided by xUnit. This checks whether the method called in the Act part has returned true.
We can run this test via the test explorer. Because the PlayerHasConsecutiveTokens method is not yet implemented correctly, it returns false and the test fails:
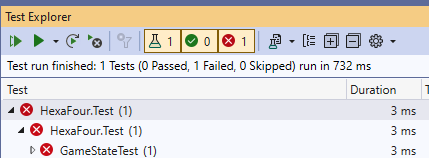
Now we can change the PlayerHasConsecutiveTokens method so that it works correctly. We then run the test again and hopefully it is successful. If the test fails, something will be wrong with the implementation of PlayerHasConsecutiveTokens. To check this, we can start the test in the debugger. This is easily done via the context menu in the test explorer or via the context menu in the code of the test method (Debug or Debug Tests, both actions have the shortcut Ctrl+R, Ctrl+T).
Test first development
We have basically done something here that is called test first development: We write the test first, which then fails because the program code for it has not yet been written. Only after the test we write the appropriate program code. Then we run the test again, and then it (hopefully) works.
Here is a list of tests that our method should successfully pass:
public void PlayerHasConsecutiveTokens_WithFourTokensInRightDirection_ReturnsTrue() { }
public void PlayerHasConsecutiveTokens_WithFourTokensInLeftDirection_ReturnsTrue() { }
public void PlayerHasConsecutiveTokens_WithThreeTokensInLeftDirection_ReturnsTrue() { }
public void PlayerHasConsecutiveTokens_WithTokensHitLowerBorder_ReturnsFalse() { }
public void PlayerHasConsecutiveTokens_WithTokensHitLeftBorder_ReturnsFalse() { }
public void PlayerHasConsecutiveTokens_WithTokensHitRightBorder_ReturnsFalse() { }
You can find these tests in HexaFourV03 on GitHub. You can also find the code for the PlayerHasConsecutiveTokens method there. I will therefore not describe this in detail here. The principle of how the tests work is the same.
Test first development or test driven development (TDD)?
A special type of test first development is test driven development (TDD). See for example: Test-driven development - Wikipedia. In TDD, too, you write the test first and then the code. Here, however, you also set yourself the goal of writing the simplest code that fulfills the test. The next time you try the same thing again, you may have to restructure the code a little first, then you can extend it so that the new test is also successful. You can find more information on this in this article by Remon Sinnema: The Differences Between Test-First Programming and Test-Driven Development.
Personally, I find TDD a bit difficult. I have a rough concept of what the method has to do in the end. Why should I first write code that is simpler than it needs to be in the end? That doesn’t really make sense to me. That’s why I usually only develop test first but not test driven.
Unit tests or integration tests?
With the above approach we have written unit tests: The tests check individual methods of the GameState class, and the GameState class does not use any other classes that would be indirectly checked by the tests. The tests therefore check the smallest possible unit, a single class. These types of tests have many advantages: they are easy to oversee, require little runtime, explain the code, lead to good code design, etc. On the other hand, they test artificial, internal things of the program: The GameState class, for example, only represents a small internal section of our game logic.
But you can also test code in a larger context. In the HexaFour example, you could also write tests that test the entire game logic. To do this, a test would first execute realistic moves to put the game in a certain state (arrange), then the test would execute an additional move (act) and finally check whether the game has reacted correctly to this move (assert). In such tests, not just one class is tested, but the interaction of several classes, which is why they are called integration tests (or inside out tests).
Some people go so far as to consider unit tests unhelpful and rely mainly on integration tests instead. If you are interested in more detail, I recommend the video Building Operable Software with TDD (but not the way you think) by Martin Thwaites on this topic.
In my view, this is not an either/or decision. You can use both approaches and combine them in such a way that the program is well tested in the end.
Code coverage, has everything been tested?
For each line of code, you should aim to have at least one automatic test that runs through this line of code. In this case, we speak of 100% code coverage. There are tools that determine this code coverage and display it in Visual Studio. For example, you can use the free tool Fine Code Coverage for this. The tool is a so-called Visual Studio Extension. In the Visual Studio menu, you can call up the sub-item Manage Extensions of menu item Extensions, search for extensions on the Internet and install them in your Visual Studio.
What does a code coverage of 100% say? Is the program then error-free? Of course not. If you are interested in more detail, you can read Code coverage on Wikipedia. There are many types of coverage, and 100% code coverage usually only means 100% statement coverage. In order to be more certain that relevant cases are being tested, branch or condition coverage would also have to be taken into account.
But in any case, 100% statement coverage is better than 50% statement coverage, and with tools like Fine Code Coverage you can identify the places that are not yet covered by tests, and add appropriate tests.
The bottom line
There are many good reasons for writing automated tests.
If we change (refactor) our code in the future, we can execute all tests automatically at the push of a button to determine whether we have broken anything as a result of the change. This is particularly valuable for large, complex programs.
I even claim that we save time through automated tests during development. Simply because we always have to try out the code. And testing via automated tests is faster than testing via manual input.
Despite these advantages, automated tests are often omitted. I think this is mainly due to overconfidence: I am sure that the code I have just written is 100% correct, programming a test then only costs additional time, I want to get ahead quickly, so I skip the test. Most of the time, however, the code I’ve just written isn’t 100% correct and I end up making faster progress if I get it right with the help of tests.
Much more could be written on the subject of automated testing. But perhaps this is enough to get you started. You can find more good reasons for automatic tests and many good tips for writing such tests in Best practices for writing unit tests.
TL;DR
This post is part of a series. You can find the previous post here and an overview here.
Visual Studio:
- As a test framework MSTest, NUnit and xUnit are well suited.
- Extension Fine Code Coverage can be used to measure code coverage.
Clean Code
- By following the information hiding principle, the code becomes more maintainable.
- Naming pattern for test methods: Name of the method to be tested, tested scenario, expected result.
- Pattern for code of test methods: arrange, act, assert.
- If you develop test first, this leads to good test cases. Whether you should even do test driven development (TDD) is a matter of taste.
- Let’s start with unit tests first, we can take care of integration tests later.
- It is worth paying attention to the code coverage.
Furter links:
Comment on this post ❤️
I am very interested in what readers think of this post and what ideas or questions they have. The easiest way to do this is to respond to my anonymous survey.