A Beginner's Guide to downloading Code from GitHub (h4-11)
A lot of source code is freely available on GitHub. Here I briefly explain how you can download code from GitHub to your own computer. If you want to write your own blog, you can also use GitHub. I also explain the first steps for this.
Download code from GitHub (without an account)
As an example, I’ll use the code I wrote for the previous article. I have published this code on GitHub. GitHub is a website where you can save source code and make it available to others. I have created a so-called repository for my code. You can view this repository in your browser via this link github.com/FrankFK/HexaFour. At first glance, this is a kind of file directory on the Internet. You can view all files in the browser, for example the file Program.cs in the subfolder HexaFour01/HexaFour.
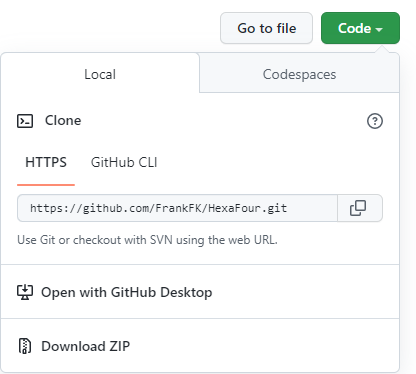
You can also download the source code. One option is to download it as a zip file. To do this, click on the green “Code” icon and select the “Download ZIP” option.
The browser will then save a new file in your download folder. Open the download folder with the File Explorer. You will then find a new file with the name HexaFour-main.zip (or similar). This zip file contains everything you need. You must extract it via the context menu (accessible with the right mouse button). Here you can specify the target directory to which the contents of the zip file should be extracted. If everything has been extracted to this target directory, you will find the complete program code of the current solution there. In the target directory you will find the file HexaFourV01.sln. You can open this with Visual Studio. The Solution Explorer should then display something like this:
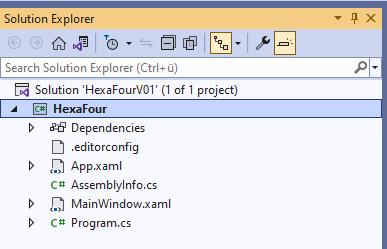
You can click F5 to compile the program and start it in the debugger.
Download code from GitHub (with an account)
You can use the above method to download code. But if you have your own GitHub account, it will be easier and you will have more options.
A GitHub account is free of charge. Creating your own GitHub account is described in Signing up for a new GitHub account. As soon as you have your own account, you can create your own repositories and also save your code in GitHub. If you have your own account, you’ll see that GitHub is much more than a simple file directory on the Internet. Github is a so-called Version Control System. This means, among other things:
- You can track all changes to your code in GitHub. For each change you make a so-called commit. Every commit is saved in GitHub and you can always see which changes you made to your code.
- Several people can work together on the same code and change it. GitHub helps people coordinate their work. For example, person A can suggest a change to the code by creating a pull request, which is then checked by person B, and only when everything is OK, the code is actually changed.
GitHub is also well integrated with Visual Studio. If you have created a GitHub account, you can learn how GitHub works together with Visual Studio via the article The Git experience in Visual Studio. As long as you only want to copy code to your computer, you don’t need to delve deep into this article. You can still manage without commits, branches, forks, pull requests, etc. However, downloading the code is then easier:
Clone
You open GitHub in your browser and log in with your account, then go to the repository you want to download, for example: github.com/FrankFK/HexaFour. Because you are logged into GitHub, the code menu will then contain additional entries:
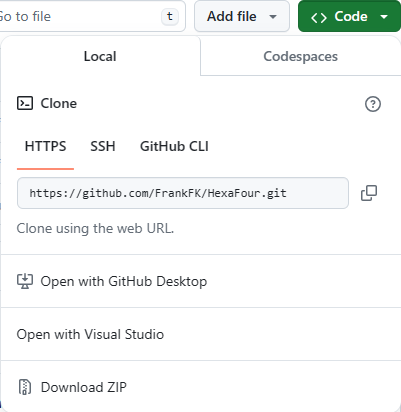
You can select the “Open with Visual Studio” entry here. Visual Studio will then open, ask you for a target directory and will automatically download everything to the target directory on your computer. This is called cloning.
The advantage here is that if the source code has changed on GitHub, you can easily update the code on your computer.
Fetch and pull
Suppose you cloned the repository to your computer a few days ago and I changed things in the central repository yesterday. Then you can simply update the code on your computer:
In Visual Studio you not only have the Solution Explorer, but also a window with the git changes. In this window, you must first click on the dashed fetch arrow. Once you have done this, you will see in the line below that there is an “incoming” change:
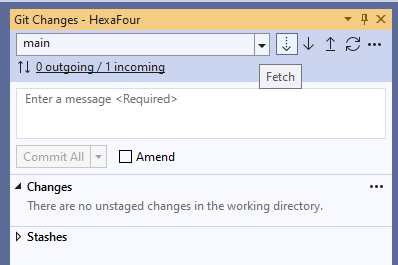
This “incoming” change is the change I made yesterday. Your files have not been changed yet, you can still decide freely. If you want the files on your computer to be changed accordingly, click on the next arrow, the pull arrow. After the pull, your local files are updated according to the incoming commits.
If pull does not work: undo changes
It may happen that the pull cannot be executed. You will see an error message like this:
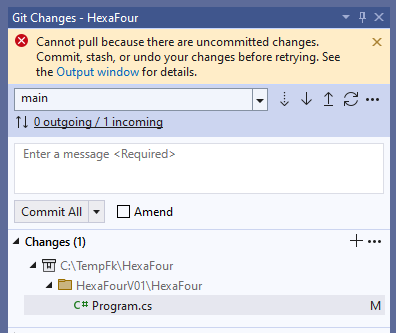
This happens if you have made changes to your local files yourself. The Git window in the example above also shows this: Under Changes you can see that the file Program.cs has been changed. Git then does not know what to do with your changes and does not execute the pull. You cannot make any changes to the repository in this example, so you must undo your changes to Program.cs. To do this, simply select the file Program.cs and choose “Undo Changes” from the context menu. After that, the Git window will no longer show any changes and you can execute the pull without any problems.
Fork
You can also make a copy of my repository. This is called fork. To do this, open my repository in the browser and then use the fork menu:
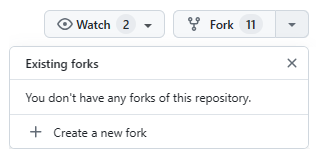
After you have selected “Create a new fork”, you will be asked what the repository should be called in your account. After you have confirmed this, your account will contain a fork of my repository. You can then clone your fork to your computer as described above. This has the advantage that you can make your own changes to this fork.
What happens to your fork if I make further changes to my repository? Nothing at first. But you can call the “Sync fork” command on the GitHub page of your fork:
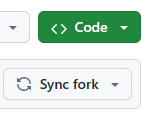
Your fork will then be updated with my changes.
Commit and push
You could also use the push arrow from the Git menu to upload your own changes to GitHub.
This does not work if you have cloned my repository directly, because then you would be writing to my repository, and only I can do that.
If you have created your own fork of my repository, you can also upload your changes to GitHub. This works in two steps. First, confirm your changes. To do this, enter an explanation of your change and then click on the “Commit All” button:

After that, your changes are noted locally. If you then click on the push arrow, these changes will be pushed to GitHub.
Collaborate on open source projects
This might be a bit early, but: There are thousands of projects on github that you can contribute to. On this page you will find references to projects that you can start with: First Timers Only - Get involved in Open Source and commit code to your first project!
You can also contribute to my Woopec library There is this Discussions page on GitHub for Woopec. If you think of something interesting about Woopec, just create a new discussion there.
Creating a blog on GitHub
Do you want to publish your own blog? Then you can also use GitHub for it. The only requirement for this is that you have your own GitHub account.
As an example, I have created a blog that you can access at https://frankfk.github.io/. This blog is generated from a repository that you can find at https://github.com/FrankFK/FrankFK.github.io. The individual blog articles are stored in the _posts subfolder. For each blog article there is a file with file extension .md, for example the file 2024-04-22-sample-post-2.md. The text in such a file is written in the so-called Markdown format. You can find a detailed description of this format on Wikipedia. Here is an example of a Markdown text:
This is an example of a **Markdown** text.
You can find a detailed description of this format on [Wikipedia](https://en.wikipedia.org/wiki/Markdown).
There are special characters for special things, such as hyperlinks or words to be written in bold. You can write Markdown files with a simple text editor (but there are also more convenient editors, I now use Typora). Tools (such as Jekyll) are then used to create an html page and output it with a predefined “theme” (I use the jekyll/minima theme in this blog). The result is the blog as you see it there.
You can find more information about creating a blog on GitHub in the GitHub Pages Documentation and in this post on Chad’s blog.
There are also platforms where you can create your blog. However, I found it better to start with Markdown and GitHub for the following reasons:
-
I don’t feel like worrying about layout, style, etc.
I write my blog text in Markdown without worrying about layout and style. Jekyll takes care of that for me.
-
The content of my blog belongs to me. I am free to move my blog somewhere else.
If I want to move away from GitHub, I can download my blog content and delete it from GitHub. I can just as well generate the markdown files into static html pages on my computer with Jekyll and then upload them to a server. That’s exactly what I did with this blog a few weeks ago and it worked fine.
-
My blog should be accessible to everyone and collect as little user data as possible.
From my point of view, the Internet is a give and take. I have benefited a lot from the fact that countless people have made their knowledge freely available on the Internet. That’s why I don’t think it’s good to place my knowledge behind platforms for which users have to pay either with money or with their personal data.
All in all, GitHub was the right tool for me to start blogging.
The bottom line
On GitHub you can find tons of freely available code that you can simply download to your computer to learn from. My HexaFour repository on GitHub will contain the code for the HexaFour blog series in the future. Currently there are only 250 C# lines, but there will be more to come.
TL;DR
This post is part of a series. You can find the previous post here and an overview here.
GitHub
- Download code as a zip file, or create an account and clone the repository.
- Use fetch and pull to update cloned code in Visual Studio.
- If you have changed something locally, you can undo it with undo changes.
- With push you can upload changes to GitHub. You can do this for your own repositories or for external repositories that you have previously forked.
- You can also use GitHub as a blogging platform.
Comment on this post ❤️
I am very interested in what readers think of this post and what ideas or questions they have. The easiest way to do this is to respond to my anonymous survey.