Draw a filled hexagon using simple C# commands (h4-03)
The previous post showed how to write your first C# program. Now we will extend the program to draw a filled hexagon. We use the Woopec library to do this. Visual Studio IntelliSense helps us understand the available commands.
Draw a hexagon
In the last post we drew some lines using Woopec Turtle graphics. Now we want to draw a hexagon. Later we will do it differently, but the easiest way for now is like this:
using Woopec.Core;

internal class Program
{
    public static void TurtleMain()
    {
        var seymour = Turtle.Seymour();

        seymour.Left(60);
        seymour.Forward(100);
        seymour.Left(60);
        seymour.Forward(100);
        seymour.Left(60);
        seymour.Forward(100);
        seymour.Left(60);
        seymour.Forward(100);
        seymour.Left(60);
        seymour.Forward(100);
        seymour.Left(60);
        seymour.Forward(100);
    }
}
For a hexagon six edges have to be painted, the edges are drawn using the Forward method. The parameter 100 specifies that the edge should be 100 pixels long. For each new edge, the turtle first turns right using the Right method. The parameter 60 specifies by how many degrees the turtle should rotate. With a value of 360 degrees it would make a complete turn. Because the turtle has to draw six edges, it must rotate by 360 / 6 each time, i.e. by 60 degrees.
Change the Color
For our planned HexaFour game we need to draw filled hexagons. For this we have to extend our program a little bit and learn more Turtle commands.
First we add a statement to the second line of our TurtleMain method that changes the Color:
public static void TurtleMain()
{
    var seymour = Turtle.Seymour();
    seymour.Color = Colors.Red;
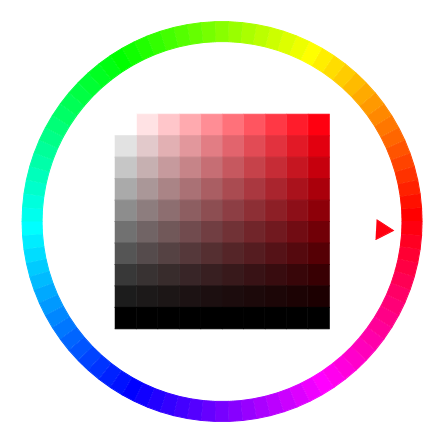
The statement seymour.Color = Colors.Red; changes the color of the turtle to red and all the lines that this turtle draws also become red. The Woopec library contains many such predefined colors. But you can also define your own colors using so-called RGB values. Transparent colors are also possible. And if you prefer to specify colors using the so-called HSV color model, that is also possible. In the following example, the outer circle shows all “rainbow-colors” and the square in the middle shows different variants of the color red:

For more information on using colors, see the Woopec documentation.
Visual Studio IntelliSense helps us understand the available commands
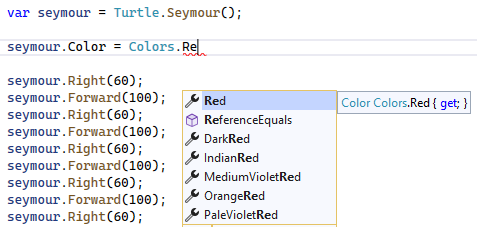
What other colors are there? Visual Studio tells us:

As soon as we have typed the dot behind Colors, all possibilities are displayed. If we continue typing and type Red, all colors in which the text Red occurs will be displayed. We can choose any of them.
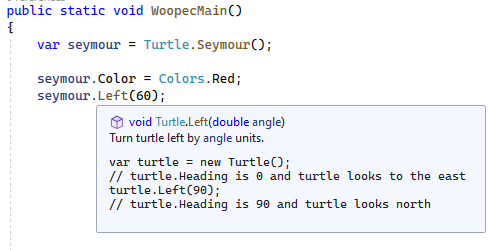
This display of available values is one of the many features of Visual Studio IntelliSense. With the help of IntelliSense we can also display more information about a method. For example, if you move the mouse to the method Left, a small description of the method and a small example will be displayed:

For more information about IntelliSense see Microsoft Learn.
More useful Turtle commands
We can not only change the color of the turtle, we can also hide the turtle so that we only see the lines. To do this, we write this statement:
seymour.HideTurtle();
With seymour.ShowTurtle(); the turtle can be shown again at any place in the program code.
If we only want to see the Turtle and no lines at all, that works too::
seymour.PenUp();
The Turtle can also move faster. Just as there are different colors, there are also different speeds:
seymour.Speed = Speeds.Fast;
There are five speeds to choose from: Slowest, Slow, Normal, Fast and Fastest.
Turtle commands for drawing a filled polygon
Finally, we create a filled hexagon. For this we need two methods: BeginFill before we start drawing and EndFill when all parts of the rectangle are painted::
public static void WoopecMain()
{
    var seymour = Turtle.Seymour();
    seymour.Speed = Speeds.Fast;
    seymour.Color = Colors.CornflowerBlue;

    seymour.BeginFill();

    seymour.Left(60);
    seymour.Forward(100);
    // ...
    seymour.Left(60);
    seymour.Forward(100);

    seymour.EndFill();

    seymour.Color = Colors.DarkOrange;
    seymour.PenUp();
    seymour.Left(30);
    seymour.Forward(50);
}
In this program we used a few other of the Turtle commands discussed. This is the result:

Further documentation on Turtle’s methods and properties can be found in the Woopec turtle class documentation.
C# class properties
Maybe you haven’t noticed, but in the code examples above we used not only methods (Left, Forward, BeginFill etc.), but also something new, which is called a class property. A class can have several properties, for example Color and Speed. You change a property by assigning a different value to it with the = character. For example, seymour.Color = Colors.Red;
The bottom line
We have managed to draw a hexagon. We could even choose any color we wanted for the filling.
In the next posts I will explain how to fix compiler errors and how to run the program step by step in the debugger. Until then, you may want to program your own image with Turtle commands.
TL;DR
This post is part of a series. You can find the previous post here and an overview here.
- The Turtle class has more methods:
ShowTurtle, HideTurtle, PenUp, PenDown, BeginFill, EndFill. - A C# class can also have properties. With the ‘=’ character you can change the value of a property.
- The Turtle properties
ColorandSpeedcan be used to change the color and speed of the turtle. See the Woopec helper classes documentation for more information. - For information about Turtle methods and properties see the Woopec turtle class documentation or use Visual Studio IntelliSense.
Comment on this post ❤️
I am very interested in what readers think of this post and what ideas or questions they have. The easiest way to do this is to respond to my anonymous survey.