How to easily write your first C# program with graphics (h4-02)
I’ll start from the beginning and explain what you need to install on your computer and how to write your first C# program. We start here with turtle graphics, because it makes it easier to get started with programming. For programming we use Visual Studio. With the debugger of Visual Studio we can start the program and understand what it does.
If you already know something about programming with C#, you can skim this and the next posts. We’ll soon be leaving turtle graphics behind and doing more complicated things.
Getting started
Before we can get started, we first need to install the right tools on our computer, and we need to know a few basic things about these tools. We need: a Windows computer, Visual Studio and Woopec.
Installing and using these tools for the first time may not be super easy. But there are some good introductory videos that explain everything you need to get started in just a few minutes. Once you’ve watched these videos, it should be relatively easy to get started.
-
Download and install the latest version of Visual Studio Community Edition. It’s free!
-
Take five minutes to learn how you to build and start your first console application with Visual Studio. To do so, watch the video Getting Started with Visual Studio 2019.
-
Close Visual Studio and open it again. On the first screen, select the “Continue without code” link.
-
In Visual Studio choose the menu item
Tools -> Command Line -> Developer Command Promptto open a command window. In the command window type the following command to install Woopec:dotnet new install Woopec.TemplatesPress Enter and close the command window.
Now your computer is ready for C# programs and graphics with the Woopec library.
Next, we create a program:
- Follow the steps of Getting Started with Visual Studio 2019 to create a new project, but instead of choosing the template “Console App” search for the template “Woopec Turtle WPF Project” and choose this template.
- Choose a name for your project, my suggestion:
HexaFour. - Specify in the Location field where the program should be saved.
- Press the Create button. Visual Studio creates the project and shows you a list of files.
- Select the file
Program.csby clicking on the file name.
The first program
In the editor window Visual Studio displays the program code from the file Program.cs:
using Woopec.Core;

internal class Program
{
    public static void WoopecMain()
    {
        var seymour = Turtle.Seymour();

        seymour.Left(45);
        seymour.Forward(100);
        seymour.Right(45);
        seymour.Forward(50);
    }
}
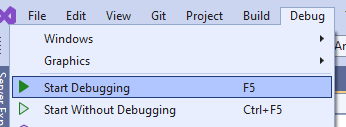
Before I explain in more detail what this program does, let’s try it out first. To do this, go to the Visual Studio menu and select Debug - Start Debugging (or press the F5 key on your computer):
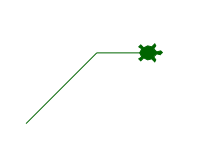
Then a window should open and display this:
To stop the program, go to the Visual Studio menu and select Debug - Stop Debugging (or press Shift and the F5 key on your computer).
The first C# commands
The most important part of the program are these four lines:
seymour.Left(45);
seymour.Forward(100);
seymour.Right(45);
seymour.Forward(50);
seymour is a graphic turtle that is moved on the screen by these four lines. Left, Right and Forward are so called methods. With these you can turn the turtle left or right and make it move forward. The numbers in brackets are so called Parameters. These indicate how far the turtle should turn or how far it should go. A single step, for example seymour.Left(45) is called statement. It is important not to forget the semicolon ; at the end of a statement. This is needed by C# to recognize where the statement ends.
The very first line of the program (using Woopec.Core;) ensures that we can use the Woopec library in our program. A library extends the C# programming language with additional functionality. The Woopec library contains a graphic turtle Turtle.Seymour() with simple drawing functions such as the Left and Forward methods. This Turtle graphic makes it easier to get started with graphics programming at the beginning (see in Woopec - C# Turtle Graphics for a little more background). In the finished game we don`t want to see any Turtles, of course. Later we use Woopec functions which have nothing to do with Turtles.
We can ignore the other parts of the program for now. They are necessary for the program to work, but we can understand them later.
Compile and run the program with Visual Studio
We use Visual Studio here. Visual Studio is an IDE (Integrated development environment). In such an IDE many useful tools are integrated. The first tool is the editor. This editor is currently showing us the contents of the Program.cs file.
When we select the Debug - Start Debugging menu item or press the F5 key in Visual Studio, several things happen:
- First, Visual Studio starts the build of the program. This means that the program code is translated into a machine-readable format, the compiled program.
- Next, Visual Studio starts the compiled program.
- Visual Studio also starts a debugger, which we can use to follow the individual steps of the program. We will come to this later.
During the compilation also an executable file is created (HexaFour.exe). We could search for this file in the file explorer and start our program by double clicking on it. This would also work without Visual Studio. But during the program development it is much easier to start the program via the Visual Studio debugger.
Fix compile errors
Programming languages are picky. A misspelled method name or a missing character will cause the program not to compile. Instead, build errors are displayed and the program cannot be started. For example, it is important not to forget the semicolon ; at the end of a statement. This is needed by C# to recognize where a statement ends. For example, if you remove the semicolon after seymour.Left(45) and run the program with F5, an error message is displayed: There were build errors. Would you like to continue and run the latest succesful build?. You have to correct such build errors before you can run the program. However, Visual Studio shows you exactly what kind of error was found and where it is located:
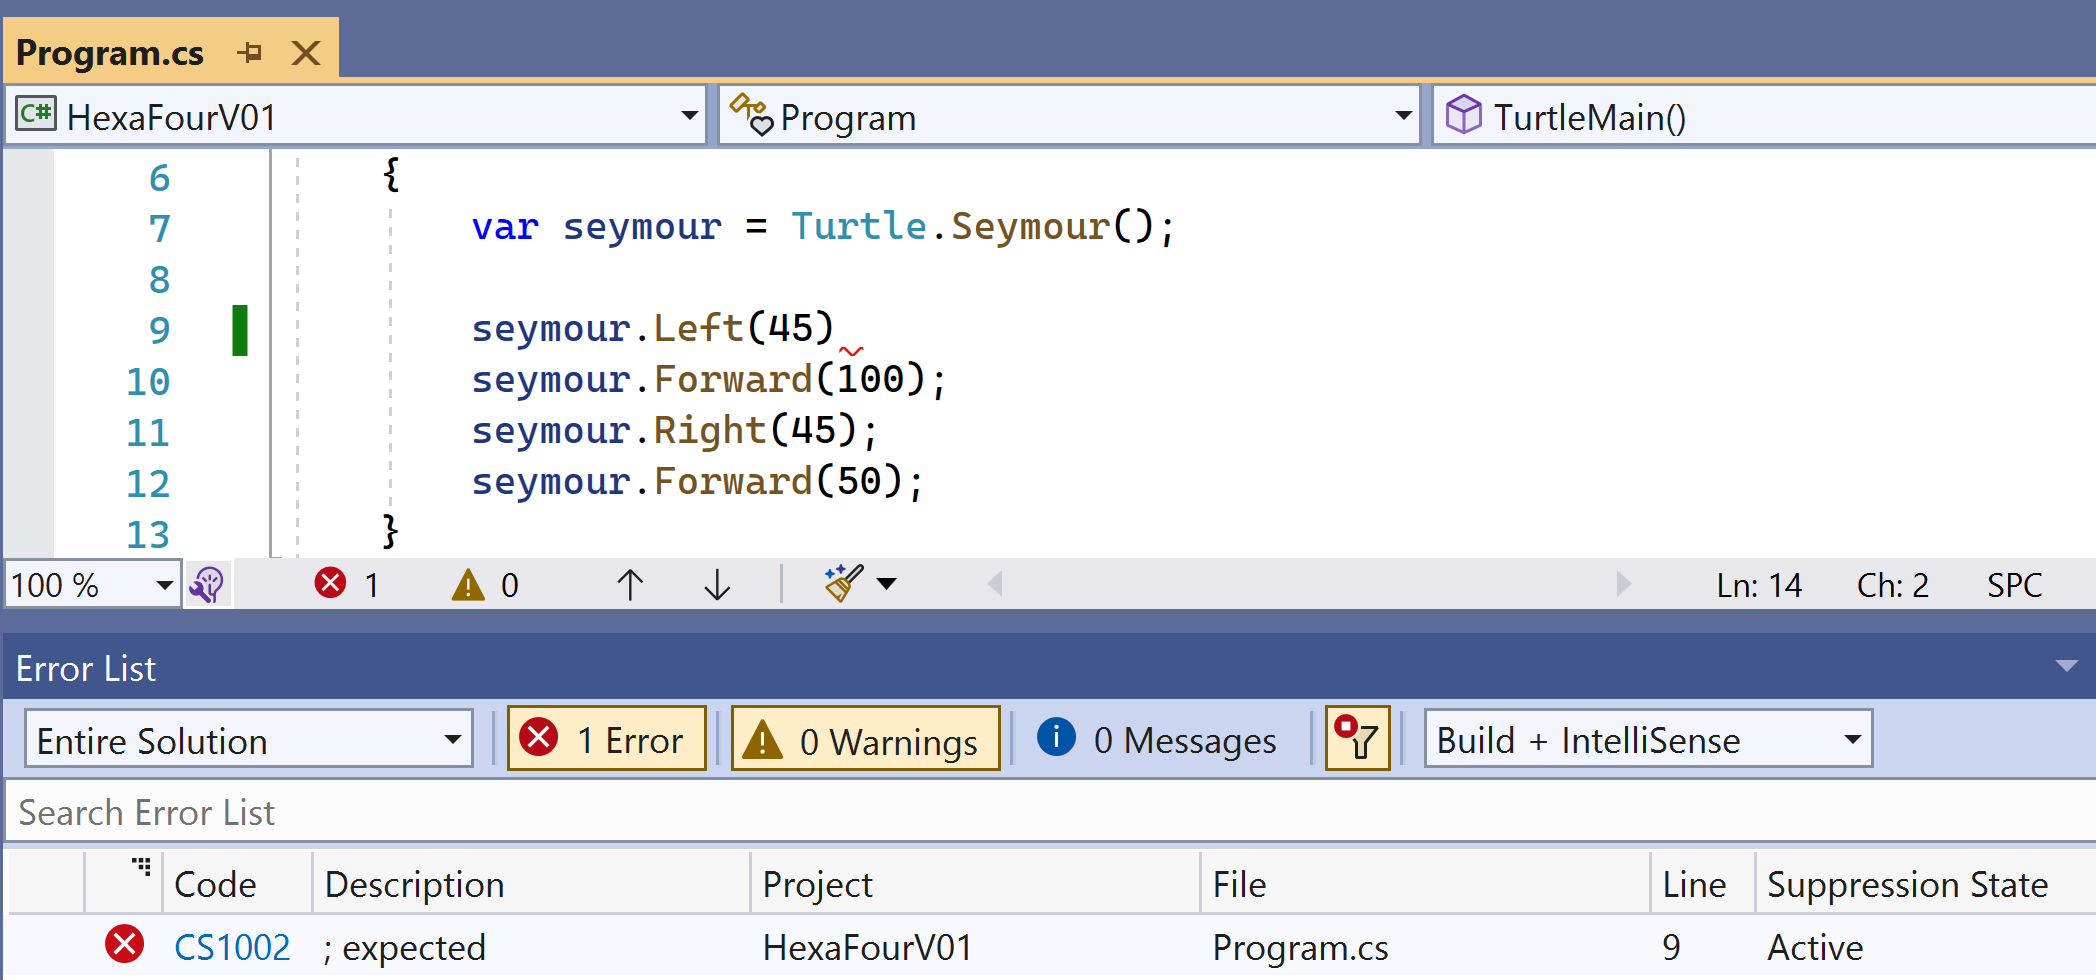
On the one hand a snaked red line in Program.cs shows where something is wrong. And additionally the Error List window shows a list of all errors with additional explanations. With a double click on a line of the error list the editor jumps exactly to the erroneous place and you can correct the error.
The bottom line
We have written our first program. That’s enough for now. In the next posts I will explain more Woopec commands and how to run the program step by step in the debugger.
Maybe you already want to change the program so that it draws a hexagon?
TL;DR
This post is the second part of a series, you can find the first post here.
- A C# program consists of statements. Within a statement a method can be called. Via parameters you can specify what the method should do. Do not forget: There must always be a semicolon (
;) at the end of a statement. - We use Visual Studio as IDE. In Visual Studio we can use intellisense to get help on how methods work. Before we can debug a program, a build must be created. If there are any problems with this, they will be displayed as build errors.
- Pressing F5 (or the menu item Debug-Start Debugging) will first create a build and then - if there were no build errors - run the program in the debugger.
- Pressing the Shift-F5 key (or the menu item Debug - Stop Debugging) terminates the program and the debugger.
Comment on this post ❤️
I am very interested in what readers think of this post and what ideas or questions they have. The easiest way to do this is to respond to my anonymous survey.